AVR Classic’s print files were 32-bit OLE COM objects. These print files are not compatible with Visual RPG’s .NET Framework-based print files. AVR Classic 32-bit print files need an explicit conversion to work with AVR for .NET Framework.
AVR 14 and 15 provides point-and-click facilities in the DataGate Explorer to import 32-bit print files into .NET Framework print files. With AVR 16 The point-and-click OLE print file import facility is discontinued and replaced by a command line utility. Both of these import processes are explained below.
Effective with AVR 17 a 32-bit OLE print import will no longer be available. AVR 17 requires Visual Studio 2022 it imposes significant COM conflicts when attempting to convert 32-bit print files.
To import 32-bit print files in AVR 14, 15, or 16, follow the instructions below. For any of the instructions below, your PC must have both your version of AVR Classic (either the dev or deployment package) and the target version of Visual RPG for .NET installed.
AVR for .NET Framework 14 and 15 targets
Visual RPG for .NET Framework versions 14 and 15 included an AVR 32-bit print file converter accessed through the DataGate Explorer in Visual Studio. To convert a 32-bit print file to a .NET Framework print file in AVR 14 and 15:
- create a Print File Definition Project in Visual Studio
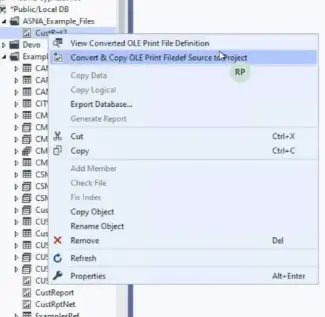
- Find the 32-bit print file in the DataGate Explorer and right-click it to a display a context menu (shown below in Figure 1. )
- Use the “Convert & Copy OLE Print FileDef Source to Project” menu option to convert the print file.
- You can optionally drag and drop the 32-bit print file to an opened print file definition project in the Solution Explorer.

AVR for .NET Framework 16 target
AVR for .NET Framework 16 doesn’t have the DataGate Explorer context menu that AVR 14 and 15 do. Rather, a command line utility is provided with AVR 16. That utility is named:
OlePrintFileToNetPrintFile.exeand it is available at the path below. Each part of the path is shown on its own line for clarity.
C:\Program Files (x86)\
    Microsoft Visual Studio\
    2019\
    Professional\
    Common7\
    IDE\
    Extensions\
    ASNA\
    Client Core Assemblies\
    16.0\
    OlePrintFileToNetPrintFile.exe
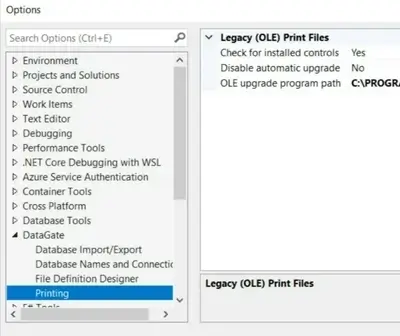
The full name of the EXE can also be seen inside Visual Studio. Use Visual Studio’s top-level Tools menu to see the full EXE name (shown in Figure 2 below):
Tools>Options>DataGate>Printing
The full EXE name is the OLE upgrade program path setting shown on the right.
The command line utility needs three or four arguments to work:
- rdb - source DataGate Database Name
- src - 32-bit print file name (in the format libary/object name)
- wrd - destination DataGate Database Name (omit this argument if the target Database name is the same as the source DataGate Database name)
- dest - converted .NET Framework print file (in the format libary/object name)
For example, to convert the 32-bit print file named custrpt in the examples library of the *Public/MyDB Database Name to a .NET Framework print file named custrptdotnet also in the examples library of the *Public/MyDB Database Name, use this command line:
...OlePrintFileToNetPrintFile.exe /rdb "*Public/MyDB" /src "examples/custrpt"
    /dest "examples/custrptdotnet"
In the command line above, the full path of the OlePrintFileTo.NetPrintFile.exe utility is omitted for clarity and the command shown on two lines for clarity. You should include the full path to the to the utility and put all arguments on one line.
